Ingredients:
Asus A7V333 motherboard
AMD Athlon XP2200+
512MB PC2700 DDR ram
2 Seagate Baracuda IV 60GB hard drives
LiteOn 48x CD/CD-RW/CD-R player/recorder
Leadtek Winfast Geforce 4 Ti 4200 128MB video card
Linksys 10/100 Ethernet adapter
Enermax EG365P-VE FCA power supply
Recipe:
Having found the very handy www.silentpcreview.com
website, I followed some of the instructions found there for modifying my
power supply. While enermax may claim that their power supply is quiet,
I don't agree. In particular the 92mm fan mounted on the bottom of the power
supply is actually pretty annoying and loud. I removed it right away. The
exhaust fan, on the other hand, was already exceptionally quiet so it remained
untouched in the final incarnation (I did borrow that fan for awhile to
use as my cpu fan, but eventually settled on a different choice there).
I did however, remove the connection between that fan and the thermistor
stuffed between the coils. As observerd on SPCR, the fan would start out
silent and then speed up to a noisy level. The result is that the fan is
controlled entirely by the knob in the back allowing me to set it high enough
to move air and yet low enough to not hear it.
Once the power supply was quiet, the next target was the cpu fan. When
I started building this system I mistakenly bought an XP2100+ cpu. This was
a poor choice because this cpu runs slower than the XP2200+ and draws more
power and produces more heat thus requiring more powerful cooling. After
changing to an XP2200+ I then purchased an Alpha PAL 8045 heatsink without
a fan (plus some arctic silver to mount it with). This heatsink mounts to
the motherboard directly which sidesteps the weight issue (the thing is big
and quite heavy). I experimented with the fan on the heatsink using a 100
ohm variable resistor until I found a resistance that would slow the fan
enough to be quiet yet keep the cpu cool enough when highly loaded (I used
Hot CPU tester for the cpu heating tests). I used this approach for slowing
the fan because I also discovered that if I used the seven volt trick that
the fan rotation sensor stopped working :-(. I ended up settling on a 5watt
resistor that for my fan resulted in a good noice/cooling compromise. I'm
not going to tell you what resistance I used because that will vary based
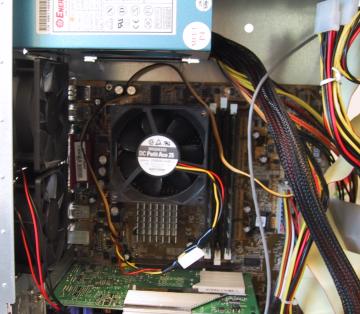
on the fan you use. The fan shown in the first picture is something I had
laying around that I experimented with! In the photo you can see the resistor
dangling below the cpu fan and above the video card :-)
|
|
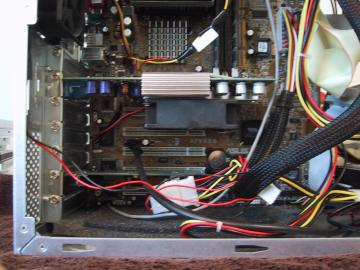
| Case views. Things to notice: The pair of exhaust
fans; the dangling resistor going to the cpu fan; the open hole in the bottom
of the power supply; the giant fan hanging off the bottom of the video card. |
Pressing onward I then selected some case fans to draw air out of the
case. The power supply fan was insufficient to keep all the components in
the system cool enough (in my opinion, of course). The way that I discovered
this is by monitoring the temperature of the hard drives (using dtemp; however,
at the time of this writing MotherBoardMonitor has been updated to monitor
drive temps too...). With the case open the hard drives would get too hot
– because there was no air flow going past them. Once the case was closed,
things were better, but still not right. The addition of a pair of undervolted
(7V) case fans in the rear did the trick. My case had a nasty bit of grillwork
in the back that I removed which resulted in two very silent fans.
At this point the system was quiet with one noisy exception: The video
card. As you can see in the next photo my solution was rather unorthodox
(but cheap!). I unscrewed the original fan (a tiny little Evercool EC5010M12C
fan) and did a little web research. I discovered that Evercool has a nice
website with the specs for their fans. The CFM of the little noisy beastie
was fairly high it turns out, but well within the capabilities of an 80mm
fan :-) The key observation I made is that the little fan was mounted to the
generous heatsink via two small screws that worked by digging into and spreading
slightly the fins of the heatsink. I attached the 80mm fan using the same
approach. The result was more airflow with significantly less noise.
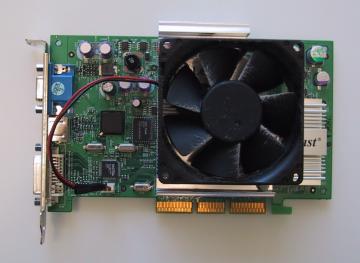
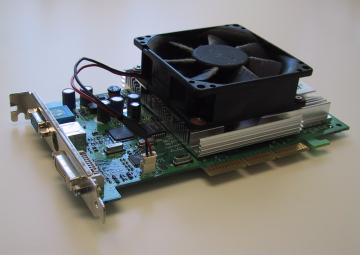
|
| Video card views. Looks kind of cool with that huge
fan on it! |
Other details:
I ended up undervolting my CPU without doing anything funky to the chip
itself. I found a nice bit of information on the web about how to change the
A7V333 voltage jumpers to some settings not documented by ASUS. The XP2200+
defaults to 1.65 volts, but I'm running mine at 1.5 volts with no apparent
difficulties. This change resulted in an approximately 4 degrees (centigrade)
drop in idle and burn in temperatures :-) With no performance loss :-) :-)
Because I swapped out the tiny video card fan for a big one I could actually overclock my video card, should I choose to.
I tried the drive suspension trick, but didn't like it -- the engineer
in me balked at it, and I observed that after attaching the rather stiff IDE
cables to the drives that the drives tended to droop in the rear. In the
end, I settled on mounting one drive low in the case directly to the mounting
rails provided by the case manufacturer. The other drive is up below the
cdrom, but not mounted to the case. Instead I built a little bit of metal
hackery to act as a heat sink and have it resting on the base of the 5.25
bay (on top of some vibration damping foam, of course). The hack is held in
with some of the suspension cord I bought. The result is that both drives
are cool and quiet. With only one drive actually mounted to the case I figure
that reduces the chance of annoying drive harmonics occuring since the two
drives won't be doing any "frequency beating" with each other.